Authentication with ngrok
01-21-2025: We updated this blog post with new instructions for using the Traffic Policy engine to establish and configure the various authentication methods.
When we think of "authentication" for our applications, most of us think of user registration, a login form, and resetting passwords. The more experienced we are, the more likely we’ll consider password hashing, blocking bots, confirming email addresses, and multi-factor enrollment and authentication. For new applications, we can add an identity provider like an Okta/Auth0 or even embed any number of framework plugins and move on to the next task.
Unfortunately, some apps don’t fit this nice, predictable model. Maybe user registration and login is unnecessary because this is a simple one-off demo to our new customer. Maybe this is a legacy application where the source code is lost to time, the team has moved onto other projects, or the overall system is working and “please don’t touch it!”
We need a quick, lightweight solution to add authentication (AuthN) without interrupting the rest of our work. Luckily, ngrok's composable gateway gives you plenty of AuthN options you can implement in a few minutes.
Using ngrok for HTTP Basic Auth
The simplest form of authentication is HTTP Basic Auth, which prompts visitors for a username and password. You can now insert Basic Auth checks into the lifecycle of every request on your endpoint using the Traffic Policy action.
Create a YAML file (policy.yaml) with the following Traffic Policy rule, with up to 10 credential pairs with passwords between 8 and 128 characters:
---
on_http_request:
  - actions:
    - type: basic-auth
      config:
          credentials:
            - USERNAME1:PASSWORD1
            - USERNAME2:PASSWORD2
You can then start an agent endpoint with that policy enabled.
ngrok http 3000 --url=<YOUR_DOMAIN> --traffic-policy-file=/path/to/policy.yaml
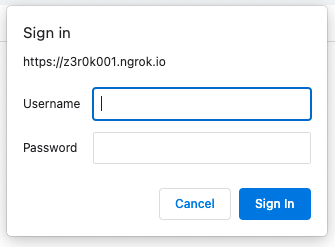
When someone accesses the domain you specify, they'll see a login modal.

With the Traffic Policy action, you can quickly instantiate an endpoint with Basic Auth enabled for one-off demos or sharing your local development work with a remote co-worker. Once you're ready to take your app or API into production, it's time to move onto a more secure AuthN method.
Tip: If this is your first time hearing about ngrok's Traffic Policy engine, take a moment to read up on how it works in our developer docs or explore the "why" in our announcement post.
Using ngrok for OAuth 2.0
If we want to really launch an API or app behind authentication, you need to get more serious. At minimum, you want individual users to have their own credentials and you don’t want to get involved in the complexity of user and password management. Luckily, that's exactly what OAuth 2.0 is designed for.

In this case, you can slightly modify the Basic Auth action to leverage Google’s login flow with our OAuth action:
---
on_http_request:
  - actions:
      - type: oauth
        config:
          provider: google
When a user accesses your endpoint, they'll be redirected to Google to complete the authentication flow, at which point Google will redirect them back to your application. That’s all it takes to put OAuth AuthN on your apps or APIs without having to modify your source code or infrastructure configuration.
That said, if you have the ability or need to modify your upstream service, ngrok collects specific fields from your identity provider and passes them along as headers.
Ngrok-Auth-User-Email: keith@ngrok.com
Ngrok-Auth-User-Id: 102528612345998048947
Ngrok-Auth-User-Name: Keith Casey
Referer: https://accounts.google.com/
You can now use these fields for logging, profile and preference management, or even to bootstrap a more complex user/authentication object for upstream APIs/apps.
But most of the time, you still don’t want anyone with a Google account logging in. First, make sure only your team can access your app or API.
---
on_http_request:
  - actions:
      - type: oauth
        config:
          provider: google
  - expressions:
    - "!actions.ngrok.oauth.identity.email.endsWith('your-company.com')"
    actions:
      - type: deny
With an expression, you can redirect any AuthN attempt that does not end with your-company.com to our helpful deny action. While this works for your-company.com emails, maybe you forgot a customer with employees who need to access your endpoint!
---
on_http_request:
  - actions:
      - type: oauth
        config:
          provider: google
  - expressions:
    - "!actions.ngrok.oauth.identity.email.endsWith('your-company.com')"
    - "!actions.ngrok.oauth.identity.email.endsWith('your-customer.com')"
    actions:
      - type: deny
You can add any number of additional expressions to filter traffic based on the action result variables of the OAuth action—you can even let in an outside contractor who doesn’t have a company email:
---
on_http_request:
  - actions:
      - type: oauth
        config:
          provider: google
  - expressions:
    - "!actions.ngrok.oauth.identity.email.endsWith('your-company.com')"
    - "!actions.ngrok.oauth.identity.email.endsWith('your-customer.com')"
    - "!actions.ngrok.oauth.identity.email == 'name@your-contractor.com'"
    actions:
      - type: deny
Now you have all the flexibility of using OAuth for effectively zero effort, still without modifying your application.
Using ngrok for OpenID Connect
While using a public OAuth provider is powerful, you may want to connect to a managed corporate or internal identity provider (IdP). In that case, you can shift to a more fine-grained approach like OpenID Connect (OIDC) with a custom provider.
OIDC is an open protocol, so you can use any provider, but I'll demo the process with Okta.
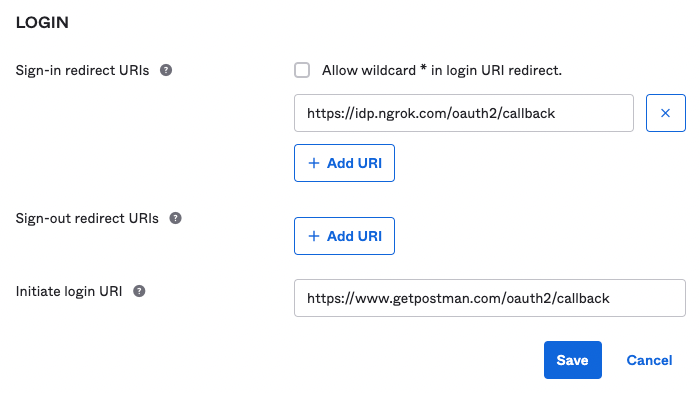
On the Okta side, you have to set the redirect URL where the ID token is sent after a successful login flow. Within the Okta Admin Dashboard, create an OpenID Connect application and specify the Authorization Code flow. Once created, add https://idp.ngrok.com/oauth2/callback as a Sign-in redirect URI.

You then need to create a new Traffic Policy file or update your existing auth.yaml file with the OIDC action, pasting in your Client ID and Client Secret under the client_id and client_secret fields, respectively.
---
on_http_request:
  - actions:
      - type: openid-connect
        config:
          issuer_url: "<YOUR_ISSUER_URL>"
          client_id: "<YOUR_CLIENT_ID>"
          client_secret: "<YOUR_CLIENT_SECRET>"
          scopes:
            - openid
            - profile
            - email
You can then apply this Traffic Policy rule to your agent endpoint, or enforce it across all your services by creating a cloud endpoint in the ngrok dashboard. Your API or app is now protected by your corporate identity provider with marginally more effort than required to use HTTP Basic Auth—and still without changing your internal infrastructure or adding new business logic to your upstream services.
Ready to bring authentication to all your APIs and apps?
Flexible authentication is a powerful capability—but one you shouldn't have to worry about instrumenting from scratch for every API or app you want to put online. Plus, ngrok's composable actions and configuration language let you filter and route traffic for even the most rigorous of production deployments.
To get started, create a free account and claim your first static domain. From there, explore our Traffic Policy documentation, and in particular, the references for each of our AuthN actions:
Questions about using ngrok in production? Want to beam over a feature request? Join us on our monthly Office Hours livestreams or drop an issue in our ngrok/ngrok community repo on GitHub.

