Add OAuth 2.0 to a Node.js CRUD app
Welcome back to our series on building a CRUD app in Node.js! We began our journey with Build a CRUD app with Node.js where you built an application for cataloging a vinyl record collection. The architecture consisted of a REST API with the Express framework and a user interface with React.js. The data entered into the application was saved in a MongoDB database.
While this post builds on what was covered in the first article, each has separate code repositories. So if you’re already familiar with how to set up a Node.js application with the elements included, you should be able to start with this tutorial.
You got your application online through the ngrok agent CLI which provided ingress through ngrok’s unified ingress platform. The ngrok agent is a very quick and effective solution when testing code running on your machine. However, in this post, you’re going to make your code more ready for production scenarios by using the ngrok JavaScript SDK. You’ll learn how to define your own static domain and set up OAuth to identify users and authorize their access to your application.
All the code covered in this post can be found in the ngrok-samples/javascript-crud-oauth-app repository on GitHub. You can clone that repo to follow along with this tutorial.
Prerequisites include Node.js, React, and more
To follow along and run this project, you’ll need to have the following software installed before you get started:
As mentioned above, if you read the first post, you started your project by creating a RESTful API in Node using the Express framework. And for the frontend, you created a separate project using React. Both projects were decoupled and run separately from each other. It’s not required to go through that tutorial before this one. However, if you’d like to take a step back and have a look, feel free to read the blog post or clone the code from ngrok-samples/javascript-crud-app.
To create a more cohesive story, you will combine the projects into a single application where you’ll serve the React frontend from the same Node process running the backend. Then, you’ll secure the application by authenticating the user's identity and authorizing their access using Google’s implementation of OAuth. Let’s get started!
Serve your React frontend
First, you’re going to reorganize a few things to make your project easier to manage. You’ll begin by adding the React project’s build directory path to the Express app as a static resource. This is the location where React deposits your web application whenever you run <code>npm run build</code>.
const reactAppDir = 'vinyl-record-frontend';

// Serve static files from React frontend
app.use(express.static(path.join(__dirname, reactAppDir, 'build')));
One thing to keep in mind when you make this change is that you’ll need to run <code>npm run build</code> to see the latest updates in your frontend. Running <code>npm run start</code> does not update the build directory.
Now that Express knows about the static files in the build directory, you’ll add a catch-all or wildcard handler that directs any traffic that does not request one of the defined <code>/api/</code> endpoints to the React app. This handler will give you the most flexibility and allow for any combination of routes defined in the React application to still be accessible.
// Handler for directing all unmatching requests to React's index.html
 app.get('*', (req, res) => {
   res.sendFile(path.join(__dirname, reactAppDir, 'build', 'index.html'));
 });
It’s important that this handler is listed after all the other endpoints defined with the Express <code>app</code> object. When a request comes in, the code will serially check each of the endpoints defined in the order they’re written. If this wildcard endpoint is defined before any other endpoint, it will swallow up the request.
Try the ngrok JavaScript SDK
To prepare for adding OAuth functionality to your application you’ll make another change to the code. You’ll use the ngrok JavaScript SDK to define ingress directly inside your application. In the last post, you utilized the ngrok agent as a CLI and ran it as a separate process from your vinyl record application. After running <code>ngrok http 3000</code>, your application was online. ngrok provided a URL that routed traffic to port 3000 on your machine.
The CLI agent is great for testing and development. However, when you begin working on more production-ready scenarios and start adding features like OAuth, you want settings like ingress to be a little more built-in to your application. So, instead of running ngrok as a separate CLI process, you’ll take advantage of the ngrok JavaScript SDK and configure your application ingress with JavaScript.
You’ll start by installing the <code>@ngrok/ngrok</code> npm package by running the following command in the root directory of your project:
npm install @ngrok/ngrokThen, you’ll require the package with a <code>const ngrok = require(“@ngrok/ngrok”);</code> at the top of the <code>server.js</code>.
Next, you’ll create an asynchronous function for your ingress settings called <code>setupIngress()</code>. Inside there, you’ll create two different objects from the ngrok package. First, you’ll build a session. Then, you’ll use that session to create a listener object. And finally, you’ll link that listener to the Express app.
The session is built with the <code>ngrok.SessionBuilder()</code> function, which allows you to chain a variety of methods for configuring a session. Your session is going to need to use the <code>.authtokenFromEnv()</code> function. It grabs the value from the same <code>NGROK_AUTHTOKEN</code> environment variable you set for using the ngrok agent CLI. Then, you’ll call <code>.connect()</code> to establish an ngrok session.
// create session
const session = await new ngrok.SessionBuilder()
  .authtokenFromEnv()
  .connect();
Now it’s time to create a listener for an HTTP endpoint using the session you just built. Keeping with the method chaining pattern used above, you’ll first specify the type of endpoint by calling <code>.httpEndpoint()</code>, and then you’ll define the domain of your application with a call to <code>.domain()</code>.
Before, when you used the ngrok agent CLI you were given a random domain defined by the ngrok platform. That domain was only good for the lifetime of the ngrok session, and it changed each time you started a new session. In order to use OAuth to secure your application, you’ll want to use a more stable domain name that won’t change each time you run your application.
You’ll need to choose either a static domain, a unique subdomain that lives on one of ngrok’s domains, or you can use your own custom domain. Every ngrok account is able to set at least one static domain, and those are easier to set up in the context of this article. When you’re ready to use your own custom domain, have a look at the How to Set Up a Custom Domain doc to learn how. The static domain I chose for this project was <code>spin-vinyl-js.ngrok.io</code>. You’ll need to select your own by defining your own subdomain.
And finally, the last piece of setting up a listener is the <code>.listen()</code> function.
// create listener
const listener = await session
  .httpEndpoint()
  .domain("spin-vinyl-js.ngrok.io")
  .listen();
With the listener defined, you’ll need to link it to the <code>app</code> Express object. You do that by passing both the <code>app</code> and <code>listener</code> objects to the <code>ngrok.listen()</code> to create a socket.
// link listener to app
const socket = await ngrok.listen(app, listener);
console.log(`Ingress established at: ${listener.url()}`);
console.log(`Express listening on: ${socket.address()}`);
By calling <code>setupIngress()</code>, your application will have efficient and secure ingress provided by the ngrok unified ingress platform!
Add OAuth 2.0 to your Node.js app
Defining your ingress settings through the ngrok JavaScript SDK and choosing a static domain sets your application up for easily adding OAuth to authenticate users and make sure they’re authorized to access your vinyl record collection. ngrok offers OAuth integrations with a variety of providers, in this project, you’ll use OAuth through Google. This is done by adding the <code>.oauth(“google)</code> method to the listener object. You’ll do this after the <code>.domain</code> and before <code>.listen()</code>.
This will require all requests to your application to authenticate with Google’s OAuth. That includes requests made to your React application through a browser, but it also restricts access to your REST API since the Express app object is linked to your ngrok session.
If you want to take the authorization one step further and only allow access to certain user emails or specific domains, you do that by passing those arguments to the <code>oauth()</code> function.
For example, if you wanted to authorize only users from a specific domain, in my case from users inside the ngrok.com domain, your <code>oauth</code> call would look like this:
// Listener with google oauth allowing specific domain
const listener = await session
  .httpEndpoint()
  .domain("spin-vinyl-js.ngrok.io")
  .oauth("google",[],["ngrok.com"])
  .listen();
If you wanted to be more precise and only allow specific email addresses, you would pass them as the second argument like this:
// Listener with google oauth allowing specific emails
const listener = await session
  .httpEndpoint()
  .domain("spin-vinyl-js.ngrok.io")
  .oauth("google",["stmcallister@gmail.com","scott@ngrok.com"])
  .listen();
The oauth method is also where you would pass clientID and client secret values in the instance you would be using your own defined OAuth app with Google. For the purposes of this project, you’re using a managed Google OAuth app maintained by ngrok. When you are ready for your application to run in production, you should Create a custom Google OAuth application.
Graceful kill switch for your Node.js app
One last bit you’ll add to your code is a graceful kill switch. With multiple tasks running inside the app, having a handler ensures all those processes end or exit cleanly is good. You’ll do this by adding a handler function that is called in a <code>SIGINT</code> event. This is the event that occurs when Ctrl+C is used in the terminal.
For your application, you’ll do two things inside the callback function for the <code>SIGINT</code> event. You’ll end your ngrok session by calling <code>ngrok.disconnect();</code>. Then, you’ll gracefully end the Node process with <code>process.exit(0);</code>.
// Gracefully kill node server
process.on('SIGINT', function() {
  console.log( "\nGracefully shutting down from SIGINT (Ctrl-C)" );
  // disconnect ngrok session
  ngrok.disconnect();
  // end node process
  process.exit(0);
});
Give your Node.js app a spin
Start your application by running <code>node server.js</code> inside your project directory. You should see the following output with your own domain listed.
% node server.js
Server is running on port 3000
MongoDB Connected
Ingress established at: https://spin-vinyl-js.ngrok.io
Express listening on: .ngrok/tun-12520089b2c2e0212a80836ebc1a1ba5.sock
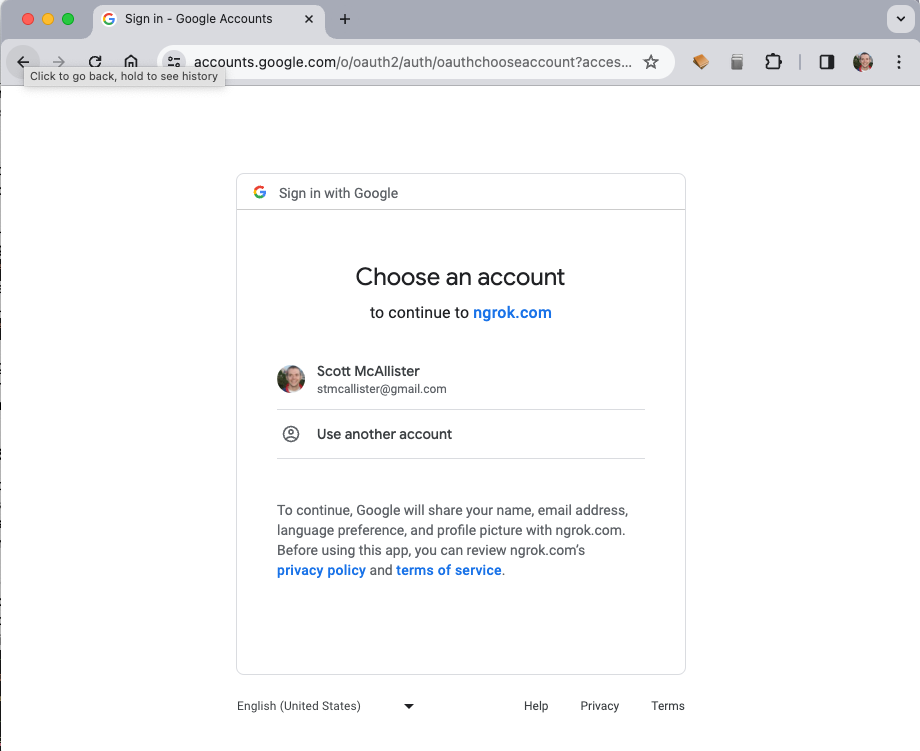
If you navigate your browser to your domain, you should be greeted by the Google OAuth window, like the one below.

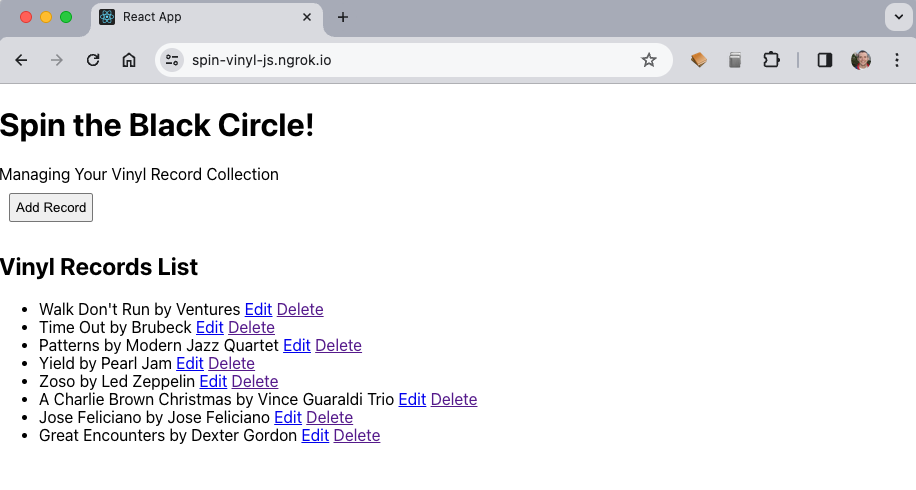
And, after authenticating with your Google credentials you should be able to see your application, like so.

With your application now requiring authentication and only allowing authorized users access, it's starting to look more and more like a production application. You still have considerations to take on, things like error handling and possibly multi-tenancy. But you’re off to a good start. You could take the main idea of this application into production, and the ngrok JavaScript SDK already has your ingress defined. So, your ingress settings remain the same no matter where you run the code.
Learn more about Node.js, Express.js, and secure ingress with ngrok
Interested in learning more about other development topics like testing authentication, ngrok, or how to get started with ingress to your production apps? We’ve got you covered with some other awesome content from the ngrok blog:
- Introducing the ngrok JavaScript SDK
- Add authentication to your ngrok traffic with Auth0
- Build a CRUD app with Node.js
Questions or comments? Hit us up on X (aka Twitter) @ngrokhq or LinkedIn, or join our community on Slack.

