Verifying PagerDuty Webhooks with ngrok
Webhooks 101
Webhooks are one of the foundations of modern API development. RESTful APIs provide us with information upon request, but webhooks deliver updates without even being asked. In development terms, a webhook is an HTTP request - usually a POST or GET - with a JSON payload or other parameters delivered from a third-party API. The difference is webhooks are pushed by the third-party system rather than waiting to be pulled.
In this article we’ll call the third-party system a webhook provider and your system receiving the request a webhook consumer.
In most cases all it takes for a webhook to be communicated between the systems is a URL for the provider to send the HTTP requests and a consumer that can receive external requests.
To work through some of these scenarios we’re going to assume a few things. First, we’re going to assume that you are already an ngrok user and have the ngrok agent installed and configured on your machine. For the sake of this demonstration we’re going to use the Sample Webhook Listener with Node + Express project to test things out. This is the same application used in the ngrok webhook integration documentation, and you can find steps for setting up the application in those docs.
In the real world, when dealing with production data, it isn’t enough to simply assume the webhook originated from the correct source. And, as explained over at Webhooks.fyi, there are several ways to secure webhooks that many webhook providers are beginning to support so consumers can have more confidence in their validity. One such provider is PagerDuty.
Webhook Security and PagerDuty
PagerDuty is an incident response platform that keeps its users informed of real-time work that needs immediate attention. They provide webhooks for events surrounding incidents–such as when they’re triggered or acknowledged–as well as for services. When an incident is active it’s imperative that everyone involved is kept up to date with current information in real-time. PagerDuty webhooks let you push information about those events as they occur.
To verify that their webhooks can be trusted, PagerDuty supports shared secret security where they sign their webhook payloads by including the <code>x-pagerduty-signature</code> header with each webhook. The signature is an HMAC of the payload body using a SHA-256 hash. PagerDuty provides steps for manually verifying the signature in their documentation.
Those steps include:
- Extract the signature from the request
- Compute the expected valid signature
- Compare the signatures
For the first step, we talked about retrieving the x-pagerduty-signature header value above. In JavaScript, computing the expected valid signature in step two would require pulling a module like crypto to create the HMAC value. Using crypto to do this would look something like this:
var expectedSignature = crypto
    .createHmac('sha256', pdSecret)
    .update(payloadBody)
    .digest('hex');
Then, because PagerDuty uses versions in their signatures you would need to append the version to the front of the computed signature, like so:
let signatureWithVersion = “v1=” + expectedSignature;And finally, finally you compare the expectedSignature with the passedInSignature.
While it’s not an impossible process, it’s easy to make a mistake. But, let’s see what the same task looks like using ngrok’s webhook verification feature.
Steps for setting up PagerDuty webhooks and integrating them with ngrok are already listed in the PagerDuty webhooks section of the ngrok documentation. For this article we’re going to dig a bit more into setting the webhook verification feature with PagerDuty webhooks.
Verifying PagerDuty Webhooks with ngrok Agent
When you first setup your ngrok agent to consume PagerDuty webhooks you probably just used the ngrok http 3000 command. To verify that the incoming webhooks are coming from PagerDuty you'll add two arguments to your ngrok command. The first, --verify-webhook=pagerduty verifies the source of the webhook as PagerDuty. Next, you’ll use --verify-webhook-secret={your_webhook_payload_signing} replacing {your webhook payload signing} with the secret value you are given in PagerDuty when creating the webhook.
Admittedly, this can be a bit of a chicken-and-egg scenario. To create the webhook subscription in PagerDuty you need to know the webhook destination--the url created by running the ngrok command. And, to run the ngrok command you need to know the webhook secret to set the value for --verify-webhook-secret so you’ll need a paid ngrok account.Then you can pass the domain with your ngrok command: ngrok http 3000 --domain=my-super-rad-domain.ngrok.app command. I recommend you use your own super rad domain with your username. This super rad domain is mine. Now you should get a screen like this:

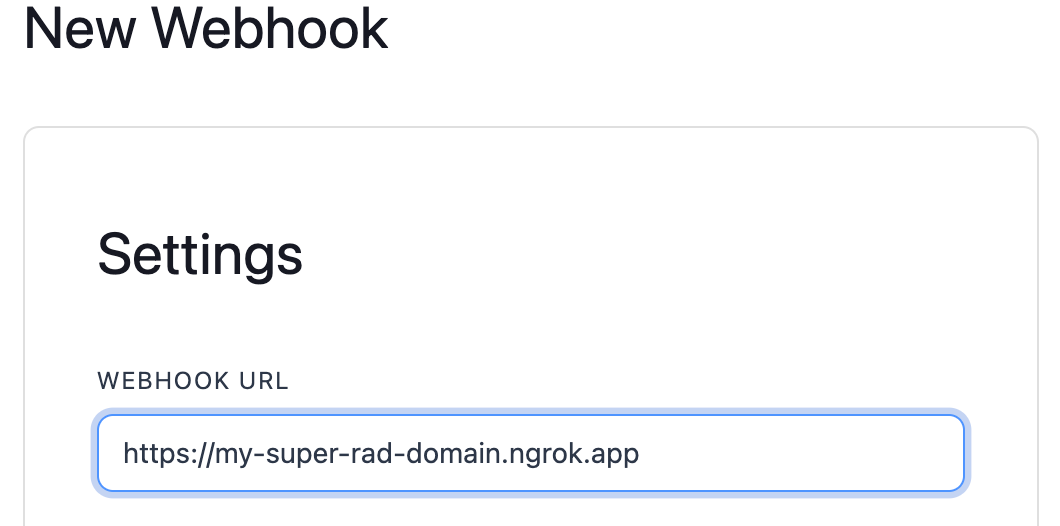
Over in PagerDuty, go ahead and create a new Generic Webhook Subscription. When registering your webhook in PagerDuty, be sure to use the domain you chose in ngrok as the Webhook URL

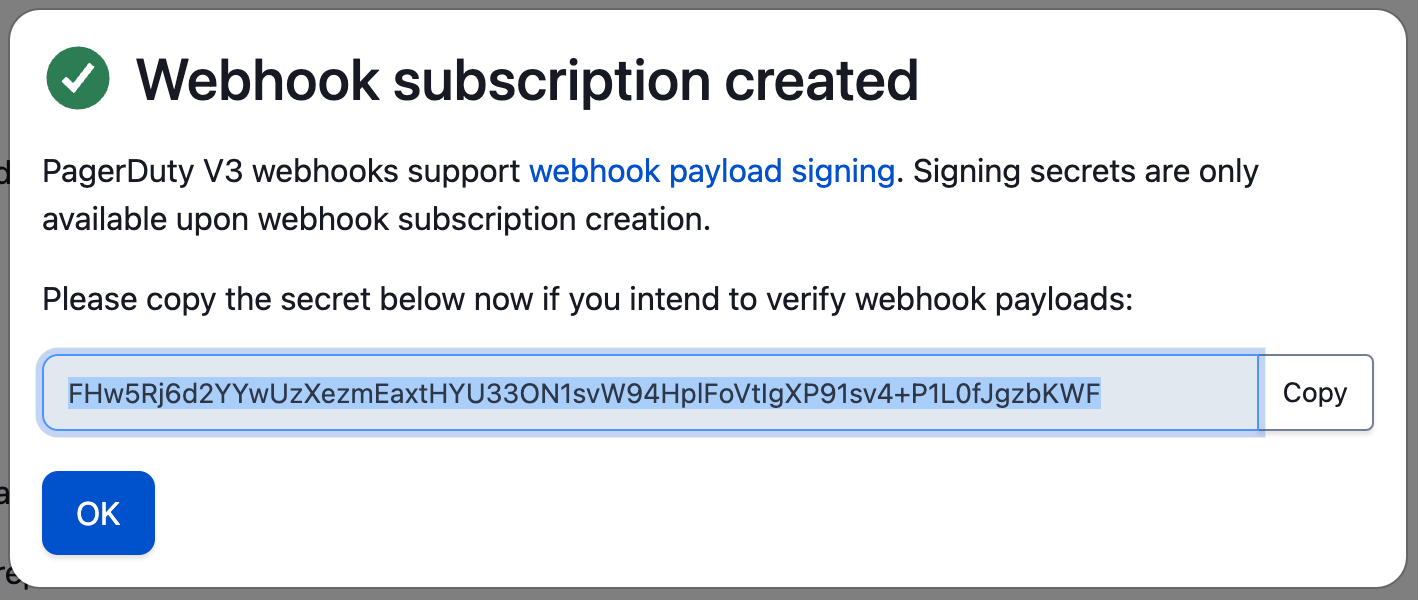
Then, when clicking the Add Webhook button you’ll be shown your webhook secret, as seen below. Copy this value and use it in your ngrok command for the value of the --verify-webhook-secret argument.

Bringing everything together, your ngrok command should look something like this.
ngrok http 3000 --domain=my-super-rad-domain.ngrok.app --verify-webhook=github --verify-webhook-secret=REallyb1gr3dact3DStr1nGNow it’s time to test out our webhook. You can do this in a couple ways. You could manually trigger a PagerDuty incident and see if your sample application receives the webhook. Alternatively, PagerDuty provides a super handy test feature for webhooks in the webhooks UI. You can find it by clicking on your newly created webhook to view its settings. Scroll to the bottom of the page to the Test section and click on the Send Test Event button.

The test event from PagerDuty will be the following short friendly message from Pagey, assuming the webhook and ngrok are set up correctly.
{
    "Headers": {
       "host":"my-super-rad-domain.ngrok.app",
       "user-agent":"PagerDuty-Webhook/V3.0",
       "content-length":"228",
       "accept":"application/json",
       "content-type":"application/json",
       "x-forwarded-for":"52.89.71.166",
       "x-forwarded-proto":"https",
       "x-pagerduty-signature":"v1=2600a856REallyb1gr3dact3DStr1nG45b8268d0c8c1be36a1ca",
       "x-webhook-id":"2c040c17-6a2f-4da8-956b-1bb62d0cca24",
       "x-webhook-subscription":"PFHTM0J",
       "accept-encoding":"gzip"
    },
    "Body": {
       "event":{
          "id":"01DU7VOL8XT9UNB48AIQLKAKD7",
          "event_type":"pagey.ping",
          "resource_type":"pagey",
          "occurred_at":"2023-05-25T19:12:38.096Z",
          "agent":null,
          "client":null,
          "data":{
             "message":"Hello from your friend Pagey!",
             "type":"ping"
          }
       }
    }
 }
When you’re ready to try a real webhook, go into the Incidents section of PagerDuty and manually trigger an incident by clicking on the New Incident button. Fill out the Incident form and go back to your terminal to see the resulting request. It should look like the following with a full Event object from PagerDuty.
{
    "Headers": {
       "host":"my-super-rad-domain.ngrok.app",
       "user-agent":"PagerDuty-Webhook/V3.0",
       "content-length":"1416",
       "accept":"application/json",
       "content-type":"application/json",
       "x-forwarded-for":"44.242.69.192",
       "x-forwarded-proto":"https",
       "x-pagerduty-signature":"v1=f1f64c6bcb8fbcb5e42aaf6a91883df839874549ae94cc97e235e59d7998375a",
       "x-webhook-id":"8a101909-5a0d-43de-9b5c-d890ac835bb8",
       "x-webhook-subscription":"PFHTM0J",
       "accept-encoding":"gzip"
    },
    "Body": {
       "event":{
          "id":"01DU7WB0FUDFB9TDQPGHK7T4U1",
          "event_type":"incident.triggered",
          "resource_type":"incident",
          "occurred_at":"2023-05-25T19:20:08.660Z",
          "agent":{
             "html_url":"https://dev-ngrok-scott.pagerduty.com/users/PRIR2AS",
             "id":"PRIR2AS",
             "self":"https://api.pagerduty.com/users/PRIR2AS",
             "summary":"Scott McAllister",
             "type":"user_reference"
          },
          "client":null,
          "data":{
             "id":"Q3W7INO18I4QA3",
             "type":"incident",
             "self":"https://api.pagerduty.com/incidents/Q3W7INO18I4QA3",
             "html_url":"https://dev-ngrok-scott.pagerduty.com/incidents/Q3W7INO18I4QA3",
             "number":25,
             "status":"triggered",
             "incident_key":"498a36acebae4eb09695572d211aafa3",
             "created_at":"2023-05-25T19:20:08Z",
             "title":"ngrok webhook test",
             "service":{
                "html_url":"https://dev-ngrok-scott.pagerduty.com/services/P5KRYJW",
                "id":"P5KRYJW",
                "self":"https://api.pagerduty.com/services/P5KRYJW",
                "summary":"ngrokpaperscissors",
                "type":"service_reference"
             },
             "assignees":[
                {
                   "html_url":"https://dev-ngrok-scott.pagerduty.com/users/PRIR2AS",
                   "id":"PRIR2AS",
                   "self":"https://api.pagerduty.com/users/PRIR2AS",
                   "summary":"Scott McAllister",
                   "type":"user_reference"
                }
             ],
             "escalation_policy":{
                "html_url":"https://dev-ngrok-scott.pagerduty.com/escalation_policies/P66768I",
                "id":"P66768I",
                "self":"https://api.pagerduty.com/escalation_policies/P66768I",
                "summary":"Default",
                "type":"escalation_policy_reference"
             },
             "teams":[ ],
             "priority":null,
             "urgency":"high",
             "conference_bridge":null,
             "resolve_reason":null
          }
       }
    }
 }
If you saw this output, congratulations! You have successfully configured webhook verification with PagerDuty using the ngrok agent. One of the tradeoffs of using the ngrok agent is that all of your settings are ephemeral, or temporary. They only last as long as your ngrok session. Each time you fire up ngrok you’ll need to remember all the different arguments for setting up webhook verification. Rather than repeat ourselves each time we can set up a more permanent solution with an Edge in the ngrok Dashboard.
Troubleshooting your ngrok and PagerDuty Config
If you’re not seeing webhooks inside your application, let’s talk about some troubleshooting tips.
When the value for <code>--verify-webhook-secret</code> in the ngrok command does not match the one you received during the webhook creation process you will not see any traffic in ngrok, nor will you see any output in your application. That’s because ngrok is verifying the incoming request before it hits your code, or even before it records the request in the ngrok agent or ngrok Inspector. Also, when this happens PagerDuty senses there’s a problem because it received no response from your application and deactivates the webhook. So, after fixing the secret in your ngrok command you’ll need to re-enabled the webhook in PagerDuty.
To re-enable your PagerDuty webhook go back to the list of webhooks in PagerDuty and find your webhook in the list. You’ll notice that the webhook has a red Needs Attention label. That indicates it has been disabled. Click on the webhook URL to manage its settings.

At the bottom of the page you’ll see the Enable section. Click on the Enable button and then go manually trigger another PagerDuty Incident. If everything is configured correctly you should then see the webhook hit your ngrok Inspector.

Using the webhook verification going forward you can now be assured that the webhooks are indeed coming from PagerDuty. Webhook Verification is not only available in the ngrok agent, and as an Edge in the ngrok dashboard, but also in the ngrok libraries–such as ngrok-go and ngrok-rs.
Shared secret is only one of several ways to better secure webhooks. You can find more information about webhook security over at Webhooks.fyi
If you have any questions or super cool use cases please join the conversation at the ngrok Slack Community.

